What Lies Beneath, Part II: Secrets of the Temple Portico Roof
The Temple Portico is sporting a new roof, its first in almost a century and a half. (Keep reading for the details behind that estimate.) Just as important as a repaired roof to keep the house interior dry, conservators and historians are excited by what the preservation process “uncovered” about the roof we replaced (“Phase 2,” from the 1870s) and the original that preceded it, “Phase 1,” 1814-1816. From acorns to rafters to double-struck nails, the dome’s innards revealed a rich history to anyone patient enough to read the clues. Among the key revelations, we can now confidently date and type the roof’s previous incarnations.
Following Preservation Protocols
The roof project followed years of planning and weeks of studying its foundations. As posted earlier, conservation began with removal of the existing, Phase 2, metal cladding, followed by documentation and stabilization of the framing — curved wooden rafters — and wood sheathing beneath. When we opened a small section to examine existing conditions back in January.
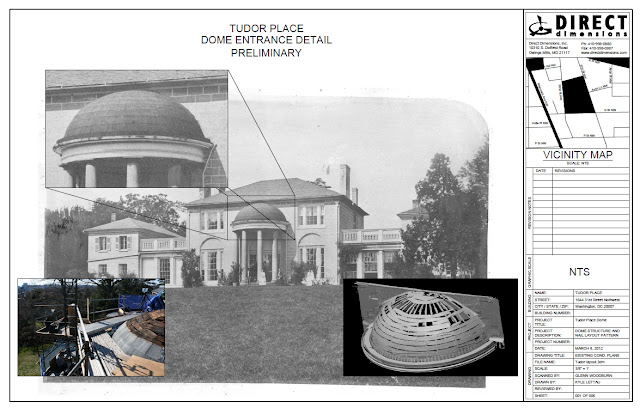
Architect William Thornton had made the Temple Portico the centerpiece of his drawings for Tudor Place, as seen below, but left construction details to be worked out by the unnamed craftsmen who built it. Because they left no records, this conservation project was our chance to see how, with simple equipment, materials and tools, they made the sketched dome a physical reality.
Any project that removes historic fabric requires scrupulous notes on all that came before — materials, design and construction — for future reference and interpretation. That’s why, as soon as the scaffolding was complete, Curator Erin Kuykendall and I mounted its top level on the first of what would be many ascents.
We made measured drawings and took photographs of the old tin roof’s seams and other construction particulars. As the project progressed, we gathered material samples for our architectural fragment collection.
Clues “Written” with Wood and Nails
From the prising up of the first metal scrap, we could see that this was going to be an exciting reveal: The wood below appeared relatively intact and displayed clear evidence of nail patterns from a still earlier roof. (We also found two acorns sitting on the rafters, which Director of Gardens and Grounds Suzanne Bouchard identified as white oak.)
Through the patterns of nail holes, the roof’s story began to emerge. In the photo above, the pulled-back metal reveals nails spaced at three-to-five-inch intervals. Looking right, though, other lines of nail holes — black ones — appear, spaced about every inch. Their pattern creates eight-inch-high rectangles of widths between six and 12 inches. This is roughly half the size of the metal pans being removed in 2012; that accorded with what we already suspected about the Phase 1 roof. But now we were getting closer to answers about how long it was there and of what it was made.
Digging down further yielded clues. Once the entire upper portion of the Phase 2 metal was gone, we found wood sheathing in varying condition. Some crumbled at the touch, but other sections were sound. Most exciting from a historical standpoint, almost all of it appeared to date to 1814-1816, the construction period of the house’s center block. From an architectural standpoint, the roofers and I marveled over the high level of craftsmanship employed in the dome’s construction, including hand-cut, curved wood sheathing and massive rafters that taper in depth as they near the dome’s top. Most likely, the rafter structure would have been crafted and pieced together at ground level before being installed above.
When it came to further narrowing dates, nails proved the best clues. The light colored wood sheathing you see at the dome’s pinnacle, above, is a different thickness than most of the darker wood below it and was attached with different nails. The wood below is sash-sawn yellow pine, cut by hand on a curve so as to wrap evenly around the spherical shape.
The specimen at far right above is a one-inch machine-cut nail used to secure tin plates. In the center is a machine-cut three-inch nail that attached the lighter-colored wood sheathing beneath the metal near the top of the dome. (These were also lightly scattered through the rest of the wood layer.) At left is the most interesting find of all: A double-struck nail of a style employed for only about three decades starting in the 1790s. This period marks the transition from fully hand-wrought nails made by blacksmiths to the introduction of completely factory-made nails, in the first half 19th century. Double-struck nails combine a machined part — the long, cut “shank” — with a head shaped by a blacksmith with two strikes of the hammer, hence the name. The blacksmith’s blows gave the heads a distinctive rectangular shape showing two depressions from each hammer strike.
The Portico roof findings conformed with date estimates of the main (central block) roof, as that larger portion was also secured with double-struck nails. This match of materials and craftsmanship confirmed our conviction that the Portico was constructed concurrently with the center block of the main house.
The Clues Beneath: Dates and Materials Answer Old Questions
Struck by the richness of this and other new information in the roof’s lower layers, we opted to delay the project for additional investigation and documentation. The postponement enabled us to invite an examination by Orlando Ridout V, renowned architectural historian and co-author of the Tudor Place 2002 draft Historic Structure Report (an architectural analysis commissioned by Tudor Place). Ridout, who heads the Maryland Historical Trust’s Office of Research, Survey & Registration, confirmed that we were indeed looking at the circa 1814 building fabric.
Until this point, Tudor Place staff and researchers had been unable to say for sure what material covered the dome during the earliest (Phase 1) period of 1814 to the 1870s. Based on wood shingles that had been found in a roof over the hyphens (the corridor sections linking the center block to the outer wings), we had surmised it might have been clad in wood. But Ridout’s inspection of the tightly spaced nail pattern (black holes) indicated that metal was the material of choice in 1814.
He also helped us home in on the dates of the later, Period 2, roof. Because its tin pans were attached with machine-cut rather than wire nails — the next step in nail technology — it must have been installed in the mid- to late-19th century. Knowing that, and assuming a life span of at least 50 years for the original 1814 roof, I delved into the Tudor Place Archives to examine early photos of the house’s south elevation.
Eureka. Although difficult to see here on a computer, looking through a magnifying glass at an early print of this circa 1873 photograph showed seams on the Portico’s metal roof that matched the seams of the tin roof we removed this year. The means the tin roof and, most likely, the repaired wood sheathing beneath it date to sometime between the Civil War and 1873. That means most of the tin still there in January 2012 was 140 years old!
The demolition process also unveiled evidence of numerous repairs over the years, especially to the roof’s flashing and water table. It is the flat portion at the bottom of the dome. Just above it, you can see a series of wood shims that were installed all the way around the dome. These were nailed atop earlier flashing that was very rusted and had obviously failed long before. Probably in an effort to skim water from the roof toward the gutter, the shims changed the angle of the bottom of the dome. Because they were attached with wire nails, we recognize them as an early-20th-century alteration.
Clues for Further Research
More clues came from the metal used for the flashing — smaller metal pieces that bridge and seal the junction of roof and wall. We found two manufacturing stamps. The earlier metal was stamped by a company called Blue Ridge, while some of the later flashing (at the water table level) was stamped by a company called Potomac. Both names indicate they were regional manufacturers, which gives us a great starting point for future research about the materials and craftsmen involved in construction and maintenance of Tudor Place.
Because half the dome extends into the mansion’s interior, the roof restoration also proffered an opportunity to look at its hidden, back side. At its top, we found, the wall is wood frame rather than masonry.
The photo above shows how the dome’s rafters were formed before the expert smoothing and shaping of the carpenters’ planes. In the shadows, what looks like scrap lumber is actually nailed joints of rafter boards coming together to make the curved dome. On the exterior, they were smoothed and carved into a semi-spherical surface, before being covered by flat metal tiles or “pans.” (The cuts ran to depths of about six inches near the top of the dome, expanding to about 18 inches near the bottom.) But within the house walls, the rafters required less labor: Their upper edges were left with the awkward-looking right-angle joints seen above.
Unfortunately, no great artifact was hidden there — just construction debris and a great view of the curved rafter design on the one side, and the backside of the dome’s plaster ceiling on the other.
A High-Tech Record of a Low-Tech Roof
Given all the roof revealed, we couldn’t resist capitalizing even further on this once-in-a-century opportunity to see “what lies beneath.” Delaying one day more, we brought out a crew from Direct Dimensions, a laser-scanning firm, to document the roof with state-of-the-art laser cameras. The data they gathered will be used for historic documentation and future research. It will help with identifying and sorting out the nail hole pattern associated with the circa 1814 roof. Most exciting of all, it enables us to create three-dimensional virtual models to use in future interpretation on the evolution of the house.
These are snapshots from the laser scan draft report:
Below, the larger dots indicate nails securing the wood sheathing to the rafters. The hundreds of lighter dots are nail holes left from the Period 1 (1814-1816) and 2 (1870s) metal roofs. If you look closely, a pattern of the smaller, Period 1 roof pans emerges (follow the gray “lines,” which are actually rows of closely spaced dots).
At Last, Repair and Reconstruction
Once the roof was scanned, repairs to the wood sheathing began. Wagner Roofing applied reclaim heart pine to adjust the water table’s slope and repair short “sister” stretches of the rafters damaged by moisture and dry rot. They used southern yellow pine to fill gaps in the sheathing. Even working with thicknesses of only 5/8 inch, they found it challenging to bend the wood onto the dome, inspiring new respect for the craftsmen two centuries ago who managed the job with only saws, hammer and nails.
Once the gaps were filled, the sheathing was covered with 1/4 inch-thick plywood to provide a solid surface for the new metal roof. Using plywood allowed us to retain most of the original sheathing, even though parts of it were in poor condition. Next, the metal crew arrived to install new lead-coated copper pans and to line the dome and gutter.
The height of each course of metal matches the tin roof just removed. This preserves the Phase 2 roof’s visual character. The metal’s shine will fade, meanwhile, to the weathered gray seen today on the hyphen roofs (to either side of the house’s center block).
The metal installation having been completed, the surrounding stucco was replaced around the roof flashing’s edges.
By Elizabeth Peebles, Preservation Manager


